Fielding a painted 6 mm army is a rewarding experience. Painting 6 mm miniatures is relatively easy if done correctly.
The Tools
Your first step is ensuring you have the correct tools. Like any other situation, not having the correct tools will make your life more difficult.
- Paint
- Brushes
- Popsicle Sticks
- PVA Glue
- Acrylic Sealer
- Primer
- Magnifying Glass
- Paint Rags
- Bases
- Dip
- Eyeglasses
- Clippers
- Hobby Knife
- Flock
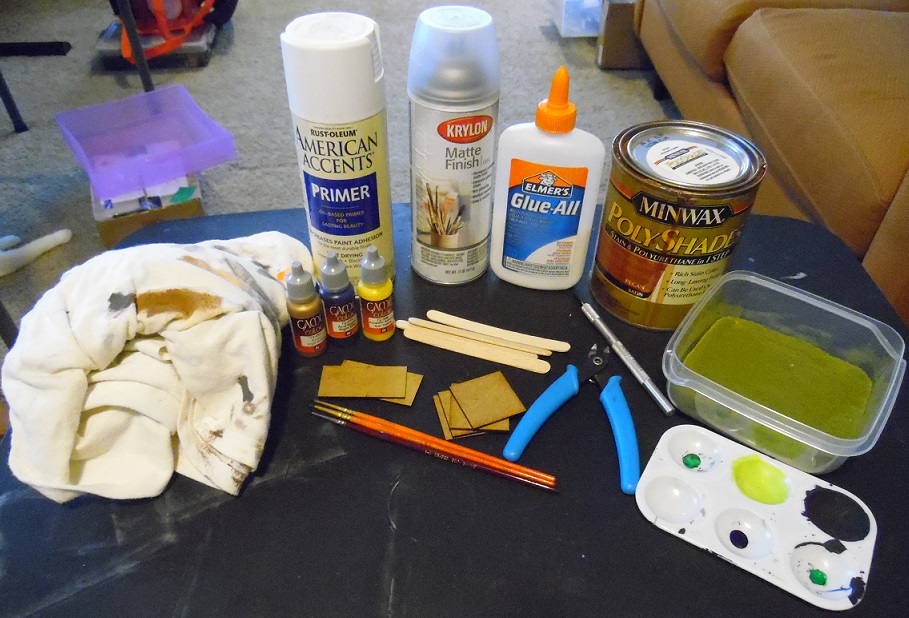
Some of the tools you’ll need to paint your 6 mm miniatures.

Brushes and Paint
First up are the essentials. You need paint and brushes. Both are available in many different qualities, from many manufacturers, and at a wide range of prices. I tend to use hobby store acrylic paint, such as those found at craft stores. You’ll find a wide range of color options at a reasonable price, though the quality of the paint consistency can be an issue on occasion. Same with brushes, I go small and inexpensive. There are several companies that make paints and brushes specifically for miniatures. These are typically superior quality, though certainly more expensive.
A selection of paints.

Popsicle Sticks
While you are at the hobby store you should pick up a few additional items. First are popsicle sticks. These are cheap also; you can buy a box of 1,000 for a few dollars.
Clippers
You will want some clippers for cleaning and if you intend on separating miniatures that are based on strips.
Hobby Knife
You will want a hobby knife for cleaning your miniatures. You can find this at the hobby store.
PVA Glue
Buy a bottle or two of white PVA (e.g. Elmer’s) glue. This stuff dries clear.
Acrylic Sealer
You’ll want some spray-on acrylic sealer. I tend to use a matte finish, though you can go with a different sheen.
Primer
You can find primer at the hobby store also, though I’ve recently switched to using flat automotive primer found at discount stores and automotive shops. Miniature manufacturers also make their own primer, which works well, though can be expensive. I use white primer for miniatures that I plan to paint with brighter colors and gray or black primer for those with darker colors.
Flocking
You may be able to find flocking at the hobby store. If not, you’ll need to order online.
Magnifying Glasses
Last up at the hobby store is a magnifying glass. These can be useful to make out some of the detail on small miniatures.
Paint Rags
Pick up some cheap rags. You can use old t-shirts or buy a cheap pack of paint rags at the hardware store.
Bases
You need bases to mount your miniatures on. You can make your own (We’ve provided a how to here.) or buy some online.
A selection of bases. 60 x 30 mm, 40 x 40 mm, and 40 x 20 mm are commonly associated with 6 mm games.

Dip
You may want some dip to quickly add shading to your miniatures. Dipping has been around for a while and likely started with the use of wood stain. Since that time, Army Painter has released their own dip product specifically for miniatures. I tend to stick with wood stain from the hardware store as it is much less expensive. I buy Minwax Polyshade in either Antique Walnut or Pecan depending upon how dark of a shade I want.
Eyeglasses
Lastly, if your vision isn’t like it used to be (As is the case with me.), wear your glasses. I stopped painting 6 mm altogether until I had my eyes checked and found I needed glasses. Now I can once again paint and rarely resort to using my magnifying glass.
Painting Your Miniatures
Mount on Popsicle Sticks
Mounting your 6 mm miniatures on popsicle sticks makes painting them much easier as they are too small to handle individually. I tend to mount three or four per stick using a small amount of PVA glue. That leaves enough room to handle the popsicle stick and be able to access all parts of the miniatures.
A few knights mounted on popsicle sticks for painting.

Clean
Here you want to remove flashing and mold lines. This is where your clippers and hobby knife will come in handy. Use the clippers to remove flashing and the hobby knife to trim down mold lines.
Prime
Prime your miniatures after mounting them to popsicle sticks. Make sure you do this in a well-ventilated area, such as outdoors or in a garage with the door open. I space mine out on top of a box, shake up the can well, and give each side of the miniature a pass. Give them plenty of time to dry; they shouldn’t be tacky when you touch them.
Clean Again!
Check your miniatures again after priming. Some of the more difficult to detect defects only reveal themselves after priming.
Base Coat
Now we can start painting. The advantage of painting 6 mm miniatures is that they don’t require the level of detail as larger pieces do. In fact, it’s only necessary to perform a base coat. You can certainly go for better detail, though my goal is tabletop quality.
I paint my miniatures in batches. This process involves painting all the same items on the miniatures at the same time. For example, with the Nubians below I start with their skin. I then paint their garments, followed by their hair, and then their slings. I save their small bases for last.
Dip
The dip method is a quick way of shading a miniature. The challenge with 6 mm is that sometimes the dip can accumulate where you don’t want it to due to the size of the miniature. For this reason, some choose to paint on their dip. Of course, you don’t have to use dip at all. You can use the standard method of using inks or no shading at all. Make sure you allow the dip to dry completely.
Remove from Popsicle Sticks
You’ll need to remove the miniatures from the popsicle sticks next. If you used a small amount of glue you may be able to just pop them off. Be careful as more fragile miniatures may snap in half. As a precaution you can stick the popsicle mounted miniatures in a freezer for a few hours. The cold weakens the glue bond allowing you to easily remove the miniatures.
Mount on Base
Next, you’ll need to mount your miniatures on a base. Exactly how you do this is up to you. If the unit is primarily skirmishers then perhaps mount them as such. If they are organized then you can line them up in straight ranks and files. (How dense is up to you.) I use PVA glue for this step, though you can use stronger glue if you’d prefer.
Flocking Base
Give the miniatures sufficient time to dry after gluing to their stand and then flock the stand. I use a two-step process for flocking. First, I apply PVA glue to the base with a brush and then more-or-less bury the entire stand in a bowl containing the flock. I let this dry at least 12 hours.
Next, I apply a second coat of flocking to the stand. With this second coat I use watered down PVA glue. Watering down the PVA glue allows you to more easily coat the entire base and acts as a seal for the first coat. Bury the stand in the flock again and allow the glue to dry.
Seal
Finally apply some spray-on acrylic sealer. I use a matte finish as dipping leaves a shiny sheen.
Completed Celts ready to charge into battle!

Confederates ready to unleash a volley.