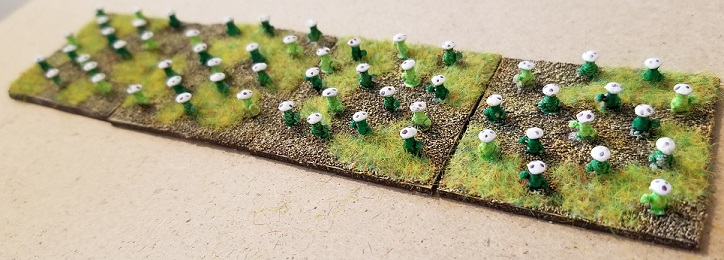
The package includes:
- Sand – This is very fine sand. The grain is perfect for 6 mm.
- PVA Glue – Used to adhere the sand to your miniature base.
- Static Grass – A short static grass that goes well with 6 mm miniatures.
- Foundation Wash – A dark brown wash that is washed over the sand.
- Base Coat – A dark tan paint that is dry brushed over the foundation wash.
- Mid Coat – A lighter tan paint that is dry brushed over the base coat.
- Top Coat – The lightest tan paint that is dry brushed over the mid coat.

We’ll go through the steps below using some mushroom men in our example. (Don’t be fooled by the bright green bodies and purple dots on their heads. These are stone cold slayers.)
Step 1 – Paint the Miniature Base
This is an optional step, though it’s something I’ve always done. I have read where some people have experienced issues with the sand adhering to the base. I believe giving the miniature base a coat of paint helps the adhesion, particularly since I use plasticard for my miniature bases. The base coat of paint also helps to hide any blemishes that may appear after wear and tear.
Paint the base prior to gluing on your miniatures. This doesn’t need to be a great paint job.

Step 2 – Apply PVA
Apply PVA glue to the base. Be careful not to get glue on the miniatures and be sure to get the entire base. A better way to do it (Which isn’t the way I did it in this example!) is to apply the PVA glue and then put the miniatures on the base.

Step 3 – Apply Sand
My method for applying the sand is to place the miniature in a small dish and then dump sand on top of the miniature. The Baccus instructions tell you to then turn the base over and give the bottom a few taps to knock loose sand off, though I prefer to just let the sand sit on top of the base to dry for a while, typically overnight. I place bases that are drying in a different container to contain any sand that may get knocked loose.


Step 4 – Remove Loose Sand
After the glue has dried, hold the miniature base upside over your container and give the bottom a few taps to knock the loose sand off. Next, use a dry brush with no paint on it to brush off any loose sand that may be on your miniatures. You should be left with something like the below. If you have any spots missing sand, then you can apply a bit of PVA glue followed by more sand and set aside to dry.

Step 5 – Apply Foundation Wash
Apply the foundation wash over the sand. I dab the wash on rather than brush it over the sand. The sand soaks up the wash turning it a deep brown. Give the wash a good chance to dry before moving on to the next step.

Step 6 – Apply the Base Coat
You’ll use a dry brush technique to apply the base coat, mid coat, and top coat. Apply the base coat over the entire base. You can apply this fairly heavily.

Step 7 – Apply the Mid Coat
Dry brush on the mid coat next. You’ll brush the mid coat on a bit lighter than the base coat as you don’t want to cover up the base coat entirely as you are doing for a graduated effect.

Step 8 – Apply the Top Coat
Dry brush on the top coat. You’ll go a bit lighter again so that you don’t cover up the mid and base coats entirely.

Step 9 – Apply Static Grass
Mix water with your PVA – about a 50/50 mix – so that you get a watered down PVA solution. Apply the watered down PVA wherever you want to apply the static grass. This can be as little or as much as you want. After applying the watered down PVA, place the base in a container (This can be the same container you used when placing sand on the base; just make sure all the sand is removed first.) and then drop some static grass on top of the base. Hold the base upside down afterward giving the bottom a few taps to knock off the excess grass.


Step 10 – Seal
Seal with your favorite sealant and you are done!

